TECHNOLOGY
An Informative Guide to Bending Sheet Metal
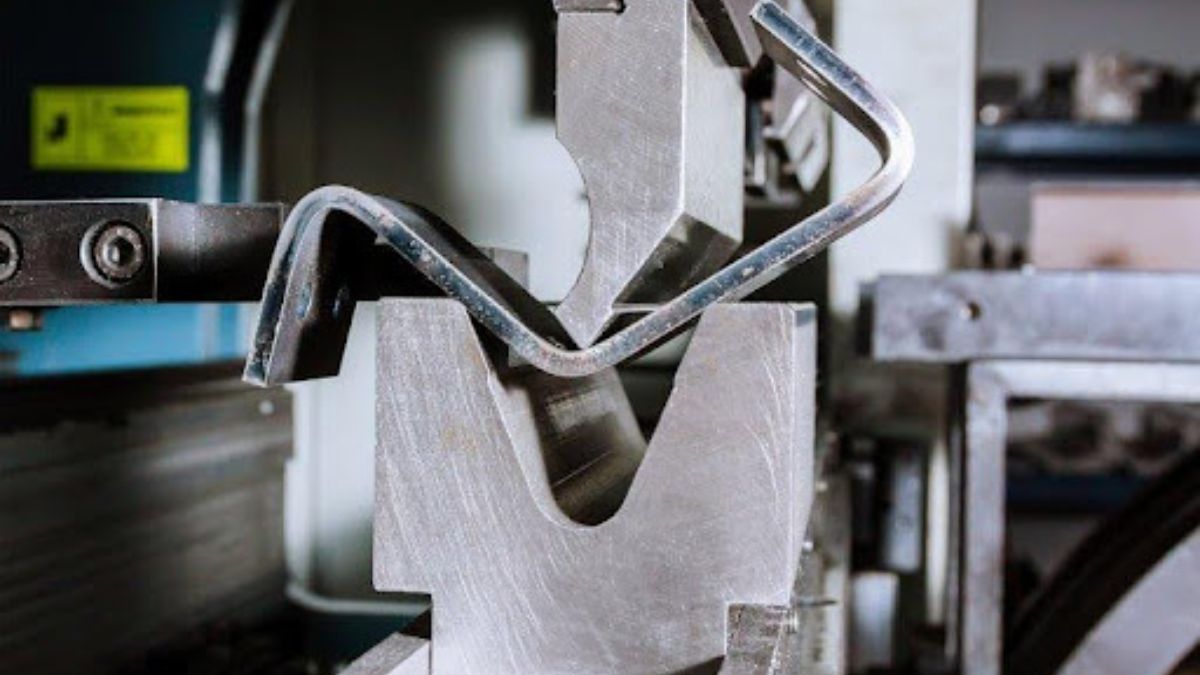
Sheet metal bending is one of the effective fabrication techniques product designers utilize to produce reliable and high-quality metal components. This metal forming technique is suitable for low production runs, which might require thin metal to make components when casting fails to provide the desired outcomes.
This article provides an in-depth discussion of everything you need to know about bending sheet metal and a step-wise guide to the process. You will find out the standard sheet metal bending techniques, applications, and helpful considerations for effective sheet metal bending!
Overview of Sheet Metal Bending
Sheet metal bending (also known as edging, forming, flanging, die bending, or press braking) is a standard metal forming process that involves applying a force to a metal sheet with a press brake to create a radius. Manufacturers and product designers often use sheet metal bending techniques to create components like fridges, electronic casings, vehicle body panels, and brackets.
Product engineers bend metal sheets once or multiple times to achieve the final geometry. However, manufacturers often use sheet metal of varying thickness. The minimum thickness of sheet metal suitable for bending is about 127 mm, while the material type and thickness frequently determine the maximum thickness. However, sheet steel is not usually more than 6 mm thick. Hence, the bend radius should be the same or greater than the material’s thickness.
A Stepwise Guide to Bending Sheet Metal

While a press brake is the most commonly used tool for bending sheet metal, it is mechanical and completely manual. Machinists use various CNC (computer numerically controlled) machines with a hydraulic system. Although they have the same working principle, the operator’s interaction differs. We’ll explore steps on how to use a CNC press brake machine to bend sheet metal below:
Step 1: Evaluate the Design Parameters
Ensure you calculate the design parameters such as required force, bend line (the point where the force is applied), and the order of bends (when you need to bend multiple times). Additionally, you have to determine the required die to create the bends.
Step 2: Prepare the Press Brake
Here, you must program the CNC press brake machine with the calculated information, preparing it for the bending operation. As such, the machine understands the required force to exert on the metal sheet to form the right bend and the required order for the bends. In addition, the right tool and die must be attached to the press and brake to make the bend.
Step 3: Align the Workpiece
Ensure the sheet metal is correctly aligned between the tool and die after the machine has been set up. Position the workpiece in the designated area and clamp it tightly to avoid deflection or inaccurate bending. The CNC machine will bend the sheet metal at the bend line once it begins operation.
Step 4: Engage the Press Brake
You have to engage the press brake for it to apply the force parameters programmed into the CNC press brake earlier in the process. Proceed to remove the part once the press brake has bent the sheet metal. Then, prepare for the next stage of production.
Step 5: Inspect and Make Adjustments
Inspect the workpiece carefully for any flaws or necessary adjustments after you have unclamped it. If the bend is inaccurate, you can make minor adjustments with a mallet or hammer. However, you may need to reposition the sheet in the brake and re-bend if the bend angle is slightly off,
Standard Sheet Metal Bending Techniques

Sheet metal bending involves deforming metal sheets along a straight axis using various techniques to achieve varying shapes and bend angles. Here are typical techniques for bending sheet metals to the desired angles:
V-bending
This widely used sheet metal bending technique employs a v-shaped die and a punch in bending sheet metals at preferred angles. The v-shaped punch presses the sheet metal workpiece into the v-shaped groove in the die, forming the metal sheet with different bend angles. For instance, you can make 90°, acute or obtuse angles based on the v-shaped punch and die angle.
U-bending
U-bending is a typical metal sheet bending technique that forms the sheet metal into a U-shape. It involves placing the sheet metal on the U-shaped die that creates two parallel bends with a flat section in between, then using a punch to press it down to force the metal into the U-shaped groove, forming a U-bend. This technique is ideal for making channels and enclosures for different applications.
Air Bending
Like the V-bending, air bending relies on a v-shaped punch and die to bend metals into preferred shapes. However, the punch in the air bending technique leaves space/air below the sheet instead of forcing sheet metal to the cavity’s bottom, allowing more bend angle control.
For instance, you can achieve bend angles ranging between 90° and 180° using the air bending methods if you have a 90° die and punch. Since less springback occurs in this metal bending technique, it provides a more accurate outcome. Springback is often avoided since it can lead to inaccurate bends.
Wipe Bending
This method lets you bend sheet metal into the desired geometry by holding the workpiece against a wipe die with a pressure pad. Then, the punch forces the metal sheet’s edge to extend beyond the die and pressure pad, making it bend over the die’s end.
The wipe bending method provides exceptional mechanical advantages, such as applying less force to achieve the preferred bends and bend angles. Nevertheless, this technique might be unsuitable for making obtuse bend angles because you might need sophisticated machinery capable of producing horizontal force.
Rotary Draw Bending
The rotary draw bending technique involves clamping the sheet metal to a rotary die and drawing around the die to produce a geometry whose radius meets the preferred bend radius. Product engineers typically utilize an internal supporting mandrel in this method to avoid wrinkling on the bent sheet metal’s wall.
The rotary draw bending technique provides extensive benefits compared to other sheet metal bending methods. One of the many benefits of the rotary draw method is that it doesn’t scratch the surface of the sheet metal and can bend metals into sharp corners with obtuse bend angles.
Bottoming
Bottoming bending is a variant of v-bending that mitigates the springback issue by pressing the workpiece down to the bottom of the die, making the workpiece touch the edge of the v- or u-shaped die. It applies additional force through the tip of the punch to deform the sheet metal in the bend region. Also, bottoming is similar to the air bending method because it offers a precise bend angle control.
Roll Bending
In roll bending, you can bend metal sheets into cones, tubes, rolls, and curved shapes. This forming method relies on rollers that feed the metal stock to the desired curvature. The roll bending technique allows you to bend metals into different cross-section profiles comprising various bending curves. It is mainly suited for producing very long sheet metal parts with 0.004 to 0.125 inches range and approximately 20 inches width.
For example, the roll bending machine can create common metal parts used in buildings for roofing, lighting, and HVAC applications such as shelving, panels, and tracks.
Helpful Tips to Consider When Bending Sheet Metal

Even though sheet metal bending types offer desirable outcomes, the process can become complicated if the technique is wrong. Hence, we will discuss helpful tips to ensure you create perfect bends on sheet metals below:
Pick the Right Material
Although different metals are compatible with sheet metal techniques, some are relatively more malleable than others. Hence, it would be best to be mindful of the use of heat and reduce any material cracking and weakening if necessary. Copper, mild steel, galvanized steel, stainless steel, and aluminum are typical materials that work best for sheet metal bends. Copper offers antimicrobial benefits, stainless steel, galvanized steel, and stainless steel exhibit good corrosion resistance and malleability.
Determine Bend Allowance
Bend allowance recompenses what happens to the workpiece when stretched and formed into the desired bend from a flat pattern. Since the metal bending process involves material pushing, pulling, or stretching, you would have to calculate the bend allowance for the sheet metal to derive reliable measurements to work with when you lay out a flat metal sheet. However, when calculating bend allowance, you must consider variables such as internal radius size and material thickness.
Protect the Sheet Metal’s Surface
Preventing the metal’s surface from scratches when bending is essential to attain a fine surface finish. You can use masking tape in any area that comes in contact with something hard. Also, wood blocks effectively protect the appearance of your metal when bending.
Prevent Sharp Internal Corners
When bending metal sheets to desired forms, avoid bending to a sharp internal corner because it can crack or weaken the metal. However, have a radius on your bending tool to mitigate this complication. Additionally, ensure the inside bend radius is the same as the thickness of the material you are bending.
Conclusion
Bending sheet metal is an integral fabrication process with a distinct edge over other manufacturing methods. It offers lower cost, high design flexibility, and increased output, providing functional components and structures for several applications. However, the application’s specific requirements, such as the type of metal, required shape, and production volume, will determine the ideal sheet metal technique for your project. Always work with a professional sheet metal fabricator to get the best results.
TECHNOLOGY
Innovative Approaches to CNC Machining for Modern Manufacturing

Introduction
Modern manufacturing is experiencing a new wave of transformation, driven by rapid advances in Computer Numerical Control (CNC) machining. At the intersection of efficiency and accuracy, CNC machining has become essential for industries ranging from aerospace to medical devices. To stay competitive and meet increasingly complex requirements, manufacturers in the sector are leveraging cutting-edge innovations such as automation, digital twins, and AI-driven processes. For companies looking to stay ahead, leveraging advanced contract manufacturing services Northern California delivers precision, flexibility, and cost savings in production workflows.
As business needs shift and product lifecycles shorten, manufacturing partners are expected not only to deliver reliability and speed but also to embrace digital solutions that reduce waste and environmental impact. Embracing new technologies enhances a company’s market position and answers the growing demand for sustainable manufacturing and highly customized products. With these new strategies, businesses can do more than optimize for today; they’re future-proofing their operations for tomorrow’s challenges.
Artificial Intelligence and Machine Learning Integration
AI and machine learning have made remarkable strides in enhancing the intelligence of CNC systems. By processing large datasets in real time, AI algorithms can refine tool paths, making continuous adjustments that maximize material removal rates, minimize tool wear, and achieve tighter tolerances. Machine learning models also play a crucial role in predictive maintenance, analyzing sensor data to forecast the remaining useful life of critical components. This reduces unplanned downtime and increases equipment lifespan. A practical example is the automatic adjustment of spindle speeds and feed rates based on detected tool wear or changing material properties, delivering consistently high-quality parts without operator intervention. According to Machine Design, AI is paving the way for digitizing traditional machine tooling, enhancing productivity and precision in CNC operations.
Advanced Materials and Intelligent Tooling
Progress in materials science has pushed the frontiers of what CNC machining can achieve. New grades of ceramics, advanced-coated carbides, and hardened tool steels have expanded the range of workable metals and composites, enabling faster, more aggressive cutting with superior surface quality. Intelligent tooling equipped with embedded sensors continuously monitors key indicators, including vibration, temperature, and load. This real-time feedback loop enables dynamic adjustment of machining conditions, preventing costly mistakes and prolonging tool life. These developments support the manufacture of components for critical sectors such as aerospace, where tolerances are tight, and margins for error are minimal.
Manufacturers adopting these advanced tools and materials can deliver increased throughput, lower defect rates, and higher product performance, positioning themselves as leaders in specialized and custom part fabrication.
Automation and Robotics
Automation is a cornerstone of next-generation CNC machining. The integration of robotics not only eliminates bottlenecks but also promotes uninterrupted, round-the-clock operations. Robots now routinely manage tasks such as material loading, unloading, sorting, and even in-line inspection. This minimizes manual intervention, improves workplace safety, and frees up skilled technicians to focus on programming and process optimization. Lower labor costs and improved throughput are natural outcomes, and, as reported by The New York Times, automation continues to be a driving force behind manufacturing growth and resilience worldwide.
Digital Twin Technology and CAD/CAM Software
Digital twin technology has created new possibilities for simulation, design optimization, and quality control. By constructing virtual counterparts of machines and manufacturing processes, engineers can run simulations to identify potential issues, test process improvements, and optimize workflows before starting physical production. This dramatically reduces setup times and material waste. Advanced Computer-Aided Design (CAD) and Computer-Aided Manufacturing (CAM) software further enhance these processes, enabling engineers to translate intricate 3D models into precise machine code quickly. This end-to-end digital thread ensures that even highly complex parts are made efficiently while preserving traceability and quality at every step.
Sustainable Practices in CNC Machining
Sustainability is no longer optional in modern machining; it is a market imperative. The latest CNC equipment features energy-efficient servo drives, closed-loop coolant recycling systems, and advanced air filtration technologies, which collectively minimize environmental impact. Manufacturers are increasingly adopting these solutions to comply with regulations and respond to customer preferences for environmentally responsible production. These efforts yield cleaner, more cost-effective manufacturing lines and help companies align with global initiatives such as the United Nations’ Sustainable Development Goals.
Conclusion
Innovative approaches to CNC machining are shaping the present and future of global manufacturing. The integration of artificial intelligence, state-of-the-art materials, automation, digital twins, and sustainable practices is raising the standard for what manufacturers can achieve. Businesses adopting these technologies are experiencing enhanced product quality, faster lead times, and cleaner operations. In this rapidly changing landscape, investing in innovation is essential for staying ahead and ensuring long-term success in the industry.
TECHNOLOGY
Techmapz Com: Latest Tools, Gadgets, and Software Reviews

Introduction
In a digital landscape packed with buzz and constant updates, Techmapz com stands out as a practical guide for curious readers and busy professionals alike. I’ve built this overview to help you navigate what Techmapz com does best: timely coverage of tools, gadgets, and software—delivered with clarity, consistency, and a dash of personality. If you care about making smart tech decisions without wasting time, you’re in the right place.
Why Techmapz com Matters
Tech decisions have real consequences—on your budget, productivity, and privacy. Techmapz com addresses this by blending hands-on reviews with contextual insights. Instead of chasing hype, it evaluates how a product performs in everyday scenarios. That means you’ll find fewer buzzwords and more grounded advice: should you buy now, wait for the next revision, or choose a competing model?
A Unified Hub for All Things Practical
What I appreciate most is how Techmapz com organizes content around user needs, not just product categories. You’ll see sections for creators, students, small businesses, and gamers, each with tailored recommendations. It’s less about spec sheets and more about outcomes—battery life that truly lasts, software that reduces clicks, and accessories that solve real pain points.
Core Content Pillars
In-Depth Reviews
The reviews go beyond unboxing. Techmapz com tests devices and software across performance, reliability, ergonomics, accessibility, and value. Benchmarks are paired with day-in-the-life scenarios—how a laptop behaves on battery during a flight, or how a note-taking app syncs across a patchy connection. Pros and cons are presented plainly, so you can make an informed decision without digging through jargon.
Comparisons and Buyer’s Guides
Side-by-side comparisons are a staple. You’ll find clear breakdowns of features, trade-offs, and total cost of ownership. The buyer’s guides are updated regularly and highlight the best picks in each price tier, along with “good enough” options for budget-conscious readers. I also like the seasonal recommendations—back-to-school kits, creator rigs, and travel-friendly setups.
Software Spotlights and How-Tos
Techmapz com doesn’t stop at hardware. It offers tutorials that actually shorten your learning curve—automation recipes, privacy settings, cloud storage strategies, and troubleshooting workflows. If you’ve ever thought, “there has to be a faster way,” this is where you’ll find it. The site emphasizes cross-platform tips so Windows, macOS, Linux, iOS, and Android users all get value.
Testing Philosophy and Methodology
Real-World Scenarios, Repeatable Methods
I’m a fan of the balanced test approach. Techmapz com pairs repeatable lab-style metrics with real-world usage: sustained CPU/GPU loads, thermal profiles, battery endurance, and network performance under congestion. Accessibility testing considers screen reader compatibility, caption quality, and color-contrast compliance. That blend makes conclusions both reliable and relatable.
Transparency and Updates
If a product improves (or regresses) after a firmware update, the review gets an update stamp and a concise change log. Affiliate relationships are disclosed plainly, and recommendations can change when pricing or competitors shift. It’s refreshing to see a commitment to correcting the record rather than burying it.
Categories You’ll Love
Phones and Wearables
From battery health insights to camera tuning and fitness accuracy, the coverage focuses on what actually affects your day. You’ll see low-light comparisons, GPS drift tests, and real-world battery metrics—how long a watch lasts with always-on display and notifications enabled, for example.
Laptops and Desktops
Whether you’re compiling code, editing 4K footage, or just browsing with 30 tabs open, performance isn’t one-size-fits-all. Techmapz com breaks down thermal design, storage speeds, port selection, and keyboard feel. It also covers silent builds, eGPU setups, and docking solutions for hybrid work.
Smart Home and IoT
Security, interoperability, and setup friction matter. Guides explain thread/matter compatibility, local control vs. cloud reliance, and how to avoid “app sprawl.” You’ll find balanced looks at smart locks, thermostats, lights, and cameras—with privacy implications clearly called out.
Software and Services
From password managers and note apps to creative suites and backup tools, the focus is on reliability and cost-benefit. Expect tips for privacy hardening, onboarding checklists for teams, and alternatives when the big names don’t fit your workflow.
Buying Smarter with Techmapz com
Deal Tracking and Timing
Price isn’t everything; timing is. Techmapz com maps historical lows, model refresh cycles, and trade-in bonuses so you can buy at the right moment. Expect alerts on last-gen clearances and bundles that actually add value, not filler accessories.
Value and Longevity
A “best” pick isn’t just fast—it’s maintainable. The site considers repairability, OS update policies, modular components, and third-party ecosystem support. You’ll see notes on battery replacement access, keyboard part availability, and whether a device locks you into proprietary accessories.
Accessibility and Inclusivity
Design for Everyone
Inclusive tech isn’t a checkbox. Techmapz com highlights features like screen magnification, hearing aid compatibility, closed captions, and haptic feedback quality. Guides also cover budget options for assistive tech, helping more people benefit without overspending.
Clear Language and Visual Aids
Reviews use plain language and consistent visuals—comparison charts, annotated screenshots, and quick-start diagrams. It’s all geared toward reducing cognitive load, whether you’re a beginner choosing your first laptop or a pro balancing multiple workflows.
Community and Trust
Moderated, Helpful Discussions
Comment sections and forums are moderated for civility and usefulness. You’ll find constructive tips, not platform wars. Staff and verified contributors label speculation vs. fact, and off-topic promotions are filtered out.
Privacy-Respecting Practices
Account controls are granular. You can opt out of tracking, export your data, and choose what’s public. Sponsored content is clearly marked, and editorial picks are based on testing—not pay-to-play.
Getting Started
How to Use Techmapz com Efficiently
- Start with the latest buyer’s guide in your category. Save two alternatives for comparison.
- Skim the testing summary for metrics that match your workflow (battery life, thermals, camera, etc.).
- Check the update notes for post-launch fixes or new issues.
- Set deal alerts for your short list and watch historical pricing.
Common Use Cases
- Students: lightweight laptops, note apps, and distraction blockers.
- Creators: color-accurate monitors, high-speed storage, and calibration tools.
- Small businesses: password managers, backup policies, and fleet-worthy laptops.
- Power users: automation utilities, dock setups, and multi-OS workflows.
Final Thoughts
Techmapz com earns trust by focusing on what matters: honest testing, clear recommendations, and practical tutorials. Whether you’re upgrading a single device or planning a complete setup, it helps you spend smarter, save time, and get more from your tech. I’ll keep refining this guide as categories evolve and new tools emerge—because staying current shouldn’t mean feeling overwhelmed.
TECHNOLOGY
Rojadirectatv: What It Is, How It Works, and Safer Legal Alternatives

Introduction
If you’ve searched for free live sports streams online, you’ve likely stumbled upon the term “rojadirectatv.” It shows up in forums, social posts, and search results any time a big match is on. In this guide, I’ll explain what it is, why it keeps appearing under slightly different names, the risks tied to it, and how to watch sports safely and legally without headaches.
What is rojadirectatv?
Rojadirectatv is commonly used as a catch‑all keyword connected to mirror sites and aggregators that list free links to live sports streams. The name echoes the long‑running “Rojadirecta” brand that has shifted domains many times. While the specific domain may change, the concept stays the same: it’s a directory of third‑party streams pointing to football, basketball, tennis, MMA, and more.
I should be upfront: these directories rarely own rights to the content they link to. They depend on external, often unauthorized, streams. That’s why they pop up, get blocked, move domains, and reappear. If you’re wondering whether visiting or using such sites is legal, that depends on your country’s laws—but in many jurisdictions, streaming unauthorized content can breach copyright law.
Why does the name keep changing?
You’ll see variations like “rojadirectatv online,” “rojadirecta en vivo,” or “roja directa tv” for a reason:
- Anti‑piracy enforcement: Rights holders monitor and take down domains that list infringing streams. When one domain falls, clones or mirrors show up elsewhere.
- Search trends: New keywords are used to dodge filters and stay visible. Slight spelling tweaks help sites re‑enter search results.
- Regional mirrors: Different domain endings (.com, .tv, .online) target specific countries or languages.
Risks of using rojadirectatv‑type sites
Before clicking any “Free HD” button, weigh the trade‑offs:
- Security threats: Pop‑ups, fake play buttons, and malicious scripts can push malware, adware, or phishing prompts. Even a mis‑click can trigger downloads you don’t want.
- Privacy exposure: Many mirrors run aggressive trackers. Some ask you to enable notifications or install extensions—both risky.
- Unstable quality: Links break mid‑match, buffering is common, and commentary can be mismatched or low‑quality.
- Legal concerns: Depending on where you live, accessing or rebroadcasting unauthorized streams may be unlawful. ISPs sometimes throttle or block such domains.
How to watch sports safely and legally
Here’s the good news: there are safer, official options that respect creators and protect you. Depending on your league and region, consider these routes:
- League apps and passes: Many competitions offer direct subscriptions (e.g., football leagues, tennis tours, MMA promotions). They often come with multi‑device support, pause/rewind, and highlights.
- Broadcaster platforms: National sports networks usually stream via their own apps or partner platforms. If you already have a TV package, you might get streaming access included.
- Aggregator services: Legal live TV streaming services bundle multiple sports channels. The price can be lower than cable and can be canceled monthly.
- Free‑to‑air and FAST channels: Some events stream free with ads on official platforms or on FAST (free ad‑supported streaming TV) services.
Tip: Check the official website or social accounts of the league or event. They usually list exact broadcast partners by country. That way you avoid guesswork and shady links.
How rojadirectatv‑style sites work behind the scenes
Understanding the mechanics helps explain why streams break:
- Link aggregation: Operators scrape public sources and user submissions to assemble a schedule. Many links point to embedded players hosted elsewhere.
- Ad overlays and redirects: Revenue often comes from aggressive ad networks. Multiple redirects increase the risk of landing on harmful pages.
- Ephemeral hosting: Streams live on throwaway servers and CDN links to avoid rapid takedowns. When a host pulls the plug, your stream dies.
- Community churn: Forum‑like chats share fresh links, but they’re unvetted and inconsistent.
Safer browsing hygiene if you still look around
If you’re researching out of curiosity or stumble onto one of these pages, basic hygiene helps reduce risk:
- Keep your browser and extensions updated, and use a reputable blocker for pop‑ups and trackers.
- Never install random “codec” packs or browser extensions just to watch a stream.
- Reject notification requests and avoid account sign‑ups on mirror sites.
- Don’t download files from streaming pages; legit streams don’t require downloads.
- Consider a dedicated, low‑risk device profile (separate browser user, no saved passwords) for general web exploration.
How to find legal streams quickly
I use a simple checklist to zero in on an official source:
- Search “<league or event> broadcast rights <your country>.”
- Visit the league’s official site or verified social accounts to confirm partners.
- Check the broadcaster’s app or site for a live schedule.
- Look for free trials or student/annual discounts to save.
FAQ’s
Is rojadirectatv legal?
The term itself is just a keyword, but the mirror sites it’s tied to often surface unauthorized streams. Laws vary by region; when in doubt, stick to official outlets.
Why do some links buffer so much?
Unofficial streams share limited bandwidth across many viewers and can be throttled by hosts or ISPs. Official services use robust CDNs tuned for live video.
Can I use a VPN to watch?
A VPN can change your apparent location, but it doesn’t make unauthorized viewing legal. For official platforms, check the terms of service—many restrict location spoofing.
Are there legitimate free options?
Yes. Some events are broadcast free over the air or on the organizers’ channels with ads. Local public broadcasters sometimes carry national team games or major finals.
Bottom line
Rojadirectatv keeps resurfacing because fans want easy access to live sports. I get it—I’ve been there, hunting for a working link at kickoff. But the safer, smoother path is to use official, legal sources. You protect your devices, support the sport, and—best of all—spend more time watching and less time chasing broken links.
-

 HEALTH2 years ago
Integrating Semaglutide into Your Weight Loss Plan: A Practical Guide
-

 HOME IMPROVEMENT2 years ago
How to Choose the Perfect Neutral Area Rug for Every Room
-

 FASHION2 years ago
7 Celebrity-Inspired Elegant Summer Dresses For 2024
-

 LAW2 years ago
Teenage Drivers and Car Accidents in California: Risks and Parental Liability
-

 CONSTRUCTION2 years ago
Construction Site Safety Regulations in New York and Your Rights as a Worker
-

 LAW2 years ago
Post-Divorce Considerations in California: Modifications and Long-Term Planning
-

 HOME2 years ago
Sandra Orlow: The Teen Model Who Captivated the Internet
-

 FINANCE2 years ago
Digital Asset Management in Florida Estate Planning
